http://www.scoutingmagazine.org/issues/9411/a-tcan.html
By Dian Thomas
For a twist on outdoor cooking (or even making camp ice cream), it's hard to beat this longtime, innovative technique.
Improvising a camp stove from a tin can is an idea almost as old as olive-colored knee stockings—yet many Scouts and Scouters have never experienced this brand of cookery. Easy to teach and master, tin-can cookery is nearly foolproof. It thus provides neophyte camp chefs a successful cooking experience and confidence to test more adventurous culinary experiments.
Be cautious in snipping tin because sharp edges can easily cut young (and old) skin. Wear gloves as a safety measure. If cooking on the trail with tin cans, flatten them after use and haul them home. In camp or at home always try to recycle the cans. To assure good health, discard cans that have been used once to cook food. It's almost impossible to clean out food particles from the crimped seams.
Not only does the tin-can stove offer a lot of fun and variety from other wood or chemical stoves, it's also an excellent item for Scouters to have in the home for emergencies like power losses.
In the tin-can stove, heat is conducted to the top of an ordinary but specially-prepared gallon can where it may be used for frying, boiling, or baking. Because of the limited cooking space on its top, the stove is best for preparing food for only one or two people.
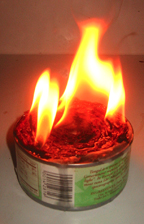
Two sources of heat may be used: a buddy burner—a tuna (or similar) can filled with rolled, corrugated cardboard and paraffin—or a wood fire built under the can.
Buddy burners add even more assurance that tin can cooking will work well. But if natural fuel is I abundant, try using a wood-stoked fire. You'll be surprised at the amount of heat a few dry twigs can supply when confined within the area inside a tin-can stove.
To make a stove and buddy burner, you need:
For the stove: one No. 10 (one-gallon) can, tin snips, a kitchen can opener, a punch-type (soft drink) can opener, and a pair of gardening gloves.
For the buddy burner: one tuna can, rolled corrugated cardboard, scissors to cut the cardboard, I and paraffin.
For the damper: aluminum foil or a tuna-can lid and a spring clothespin.
To make the burner, cut the corrugated card board across the corrugation (so its holes show) into strips the same width as the height of the tuna can. Roll the cardboard to fit inside the can, place it there, then pour melted wax over the cardboard. Heat the wax in a double boiler, because it could burst into flame if it is overheated directly over flames. This entire operation is best done outdoors, and adults should closely supervise Scouts doing this. (If the wax does burst into flames, smother it with a pot lid or similar covering.)
If you don't have a double boiler, an easy way to melt the wax is to place chunks of paraffin on top of the cardboard. Put a lighted match next to the wax, and let it melt into the cardboard until the cardboard lights. Then just keep pushing the wax into the flame, letting it melt into the cardboard until the can fills.
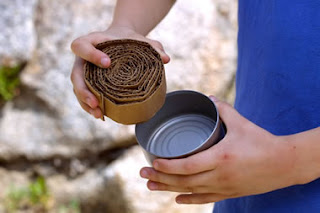
The cardboard in the buddy burner serves as a wick; when it is lit, the wax burns like a candle, providing heat for the stove. (A small waxed string wick may be placed in the center of the corrugated cardboard for fast and easy lighting.) It will help when 1igming the burner if you turn the can on its side, so the flames can spread across the surface of the cardboard more easily.
A buddy burner filled with wax will last for 1 1/2 to 2 hours. To lengthen the flame time even more, place a chunk of wax on top of the burning corrugation. If replenished with wax in this manner, a buddy burner can go almost indefinitely—because wax is consumed at a lower temperature than cardboard.
To make the stove, first slip on your gloves, then cut out one end of the No. 10 can with a can opener. Now, with a pair of tin snips, cut a door about three inches high and four inches wide on a side of the can at the open end, leaving the top of the door attached. Pull the door up toward the closed end. (Careful—the edges are razor-sharp.) At the top of the stove (the closed end), punch two to three smoke holes into the side opposite the cut-out door. This will allow the smoke to escape out the back of the stove.
Make a damper out of foil or the lid of a tuna can. The damper is a key to tin-can cooking because it gives you the ability to control the level of heat, just as you do on other stoves.
Easiest way to make a damper is with the lid of the can you used for the buddy burner. Clip a spring clothespin to it for holding, protecting your fingers from both heat and cuts. Then position the damper over the burner can, sliding it forward or backward, to expose more or less flame. By controlling the fire this way, you can have low, medium, or high heat. (Obviously, covering the entire top of the burner will cut off all oxygen, and extinguish the flame.)
Another way to make a damper is to fold a length of aluminum foil three or four times, fashioning a sheet about 1 1/2 times the diameter of the -buddy burner. Use this foil cover to adjust the flame just as you would with the can lid damper.
Your stove is now complete and you're ready to cook.
Foods. Eggs in a basket, bacon, hamburgers, taco meat, and the like are a few of the foods that can be prepared when you use the tin can stove like a frying pan.
The stove can also be used as an oven, to bake items that require a short cooking time, such as a small cake or cookies.
Frying. Light the buddy burner and place the tin-can stove over it. The stove will be ready to use in seconds. Through the doorway, adjust the damper over the buddy burner to create the desired heat. The stove works fine for cooking hamburgers or pancakes.
Baking. Place three small, 1/2-inchhigh rocks in a triangular formation on the stove.
Place on the rocks a tuna can lid with enough cookie dough for one cookie, or a tuna can almost filled with cake batter. This position keeps the food above the stove surface, preventing burning and allowing hot air to circulate completely around the food during baking.
To "close" the oven, cover the food with another can (like a coffee can). The covering can should be large enough to permit at least 1/2-inch of open space around the food, so hot air can circulate.
For an oven with a "window" cut off the other end of the cover can. Secure a piece of plastic oven wrap over this end by tying a string around it tightly. around it tightly. After placing it over the food, you can look through the "window" to check on the baking.
Emergency Stove. A tin-can stove will also serve as an excellent emergency cooking device if an emergency causes an electrical or gas failure at home.
You'll probably want to cook for more than one or two persons at a time, so you need to modify the stove to use a frying pan. To do this, simply cut off the top of the stove. Place the frying pan on top of the open tin-can stove and cook as you normally would.
Before doing so, however, rub the outside bottom of the frying pan with liquid detergent. This will make it easy afterward to clean off any soot from the burner that sticks to the pan bottom.

 An easy craft project for the family survivalist, taken from the brilliant 70’s Mormon classic: Roughing it Easy, by Dian Thomas.
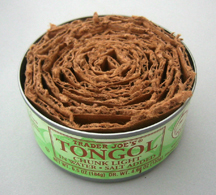


 One of the most innovative outdoor cooking methods, and excellent to have for power-related emergencies at home, is the simple homemade tin can stove which can be used for frying, boiling and toasting. It is best used for one or two people because of its small size. It is also disposable; just recycle after use.